Sunday, December 16, 2018

MongoDB & Python

Python is an interpreted, high-level, general-purpose programming language used for many different types of applications within the development community and MongoDB is a NoSQL database which has become pretty popular throughout the industry in recent years. NoSQL databases provide features of retrieval and storage of data in a much different way than their relational database counterparts. 

In this blog I have share some basic examples, commands, Software used in process of interaction between MongoDB and Python,

Why You Should Use MongoDB?

The following are some of the MongoDB advantages:
  • Flexible schema – it maintains a hierarchical data structure
  • A large number of the MongoDB drivers and client libraries. MongoDB Drivers are used for connecting client applications and the database. For example, if we have a Python program and we want to connect it to MongoDB, we need to download and integrate the Python driver so that the program can work with the MongoDB database
  • Flexible deployment
  • The document-oriented storage (in the form of JSON style documents)
  • JavaScript as a language for querying
  • Dynamic querie
  • Index support
  • Profiling queries
  • Effective storing of large amounts of binary data, such as images and videos
  • Journaling operations of modifying data in the database
  • Supporting fault tolerance and scalability: an asynchronous replication, a replica set and a distributed database connected to the nodes
  • Can work in accordance with the MapReduce paradigm. MapReduce – a programming distributed computing model provided by Google that is used for parallel computing on a large, multiple petabytes, data sets in the computer clusters
  • Full-text search, supporting Russian language and morphological analysis
  • MongoDB supports horizontal scalability through sharding. Sharding is the process of storing data records across multiple machines. This approach is used in MongoDB to meet the data growth demands. As the size of the data increases, a single machine may not be sufficient to store the data nor provide an acceptable read and write throughput. Sharding solves the problem with horizontal scaling.
For decades, SQL databases used to be one of the only choices for developers looking to build large, scalable systems. However, the ever-increasing need for the ability to store complex data structures led to the birth of NoSQL databases, which allow a developer to store heterogeneous and structure-less data.

PyMongo

The official driver published by the Mongo developers is called PyMongo. This is a good place to start when first firing Python up with MongoDB. The first thing you’ll want to do is to install PyMongo in your environment which is done using PIP3


When you will run above command in shell it will load pymongo files in your environment. Once you are done with the setup, start your Python console and run the following command:


import pymongo

If it runs without raising any exception within the Python shell then your install worked just fine. If not, then carefully perform the steps again.

Create Database & Establishing a Connection

To create a database in MongoDB, start by creating a MongoClient object, then specify a connection URL with the correct IP address and the name of the database you want to create. MongoDB will create the database if it does not exist, and make a connection to it.
You can check if a database exist by listing all databases in your system:

Why it doesn’t have testDB which we just created? As you know MongoDB waits until you have created a collection (table), with at least one document (record) before it actually creates the database (and collection).  So let’s create a collection called "customers" and insert a record, or document into this collection


As you see created a dictionary object with name and address and inserted into collection “customers”. If it runs without raising any exception then it worked fine but to verify we can always print inserted id of document. Or you can use Robo Mongo to check if collection created with document or not, at my end after these commands execution Robo Mongo looks as follows


You can insert multiple documents using insert_many method


You can find all documents in Robo Mongo or run find command, when view documents in Robo Mongo it will look as follows
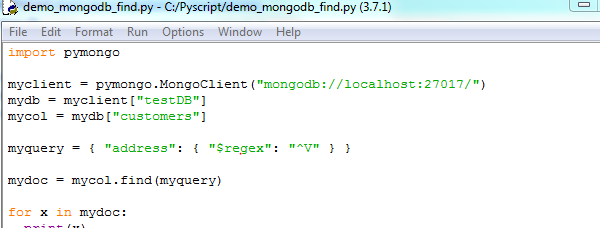


With find command in script using IDLE (Python 3.7 64-bit)


Output of script will be listing all documents of collection


Find document(s) with the address Vancouver


Find documents where the address starts with the letter "V":


Update Collection
You can update a record, or document by using the update_one() or update_many() method.


Delete Document
Delete the document with the address “Vancouver" using delete_one or delete_many


I have covered all crud operations using PyMongo and core is the MongoClient object. For more examples & method details you can refer Documentation at location https://api.mongodb.com/python/current/

MongoEngine

MongoEngine is Object-Document Mapper (ORM-like, but for document-oriented database) that allows to work with MongoDB on Python. To specify the schema document, we create a class that is inherited from the Document base class. Fields are determined from adding the document’s class attributes. You can install MongoEngine again using PIP as shown below


for demo purpose only I will create very common example class​ which is very basic script that’s will connect to mongo DB, Define document and document's schema of WikiPage with just title & description


If I open Robo Mongo I will see page1 & page 2 entered into wiki pages


For more examples & method details you can refer Documentation at location http://docs.mongoengine.org/  As Agreed Today I focused on Python & MongoDB interaction, next time I will share examples on Object-Oriented Programming in Python.

What do you think? Let me know your inputs & suggestions.

Courtesy: Several online blogs, you tube videos, tutorials & other resources

Friday, September 21, 2018

Agile Product Road-map


A road-map is every bit as important to an agile team as it is to a waterfall team because it provides context around the team's every-day work, and responds to shifts in the competitive landscape.

How an agile road-map differs from a waterfall road-map

A waterfall product road-map communicates a long-term commitment to building specific features on a set timeline. However, an agile road-map accommodates inevitable changes while still committing to getting meaningful work done. It communicates a short-term plan for achieving product goals, with the flexibility to adjust that plan according to customer value.

Here are some key ways that agile and waterfall road-maps differ:


Waterfall road-map
Agile road-map
Goals
Business-centric
Customer-centric
Planning horizon
Years
Months or quarters
Planning cadence
Annually
Quarterly
Resource / capacity planning
By major project
By small team
Investment
Committed
Incremental
Collaboration
Segmented
Cross-functional team
Flexibility
Limited
Limitless


Goals: Waterfall organizations often set business-centric goals, measured by financial KPIs. Agile organizations often set customer-centric goals, such as user growth and customer delight.

Planning horizon: A waterfall product road-map reflects commitments to a longer-term timeline — typically a year or two. And an agile road-map reflects quarterly (or even monthly) commitments.

Planning cadence: Waterfall organizations commonly do annual strategy and product planning. Agile organizations usually do it much more regularly in quarterly strategy and product planning cycles.

Resource / capacity planning: A waterfall road-map reflects heavy upfront dedication of resources, which are allocated by project. An agile road-map considers the sprint team the resource unit and can allocate by sprint velocity or team capacity.

Investment: Waterfall-driven products receive funding according to the organization’s annual planning cadence. These funds are committed for the year and are often based on the previous year. By contrast, agile-driven products can be funded incrementally as the organization adjusts its portfolio based on customer feedback and data.

Collaboration: In a waterfall organization, work is sequential and segmented — with one department’s phase typically unable to advance until the previous one is completed. In an agile organization, teams collaborate on a plan and work cross-functionally and concurrently.

Flexibility: Because of how work is planned and funded, waterfall road-maps have limited flexibility. Agile road-maps accommodate extensive flexibility. This can create its own set of challenges because teams need to be careful that unlimited flexibility does not lead to unnecessary pivots in development and resources.

In this post focus was on how an agile road-map differs from a waterfall road-map, next time we will discuss steps to create an Agile Product Road-map.

What do you think? Let me know your inputs & suggestions.

Courtesy: Several online blogs, you tube videos, tutorials & other resources

Thursday, November 2, 2017

React & Redux for beginners: An Intro

Redux is a framework that controls states in a JavaScript app. According to the official site:

  Redux is a predictable state container for JavaScript apps.

Learning a new JavaScript framework in 2017 can be a daunting task. I find the article to be one of the most helpful tutorials out there. It can still be too much for someone starting out in React/Redux so I documented my journey. 

Demystifying Redux

To start with Redux, let’s see various component for Redux
  • Store
  • Reducers
  • Provider
  • Containers
  • Components
  • Actions

 
Store: Manages the states. Mainly there is a dispatch method to dispatch an action. In a Redux app, you can obtain its states via store.getState()

Reducers: Reducers take in actions and update part of application state.
·         We combine all reducers into a single object before updated data is dispatched (sent) to store
·         Your entire applications state (store) is just whatever gets returned from all your reducers

Provider: it connected state and application components

Components: Containers are very similar to components, the only difference is that containers are aware of application state. If part of your webpage is only used for displaying data (dumb) then make it a component. If you need it to be smart and aware of the state i.e. whenever data changes system become aware

Containers: Containers fetch state data and use it to render (display) components.state data will become components props
Containers are similar to components. However, only containers have access to state data in Redux.components are sometimes called "dumb components" or "presentational components"
Actions: A simple, plain JavaScript Object. An action can also be considered as a command to change a state.
  
Redux Example

Let’s make an example application which will list down users and selection on any user will show its details. Application data flow is as follows


I have used JetBrains “WebStorm 2017.2.5” IDE for making learning sample, latest Node JS and step one is to build page which will list down users say index.html

index.html

<!DOCTYPE html>

<html lang="en"><head>     <meta charset="UTF-8">     <title>React Webpack</title></head><body>     <div id="root"></div>     <script src="js/bundle.min.js"></script></body></html>


Root is main container which will hold all application components i.e. display or render dynamic page then let’s create file structure for our sample application, as shown in below snapshot


We will be creating #1 component, which will list down #2 different type of data , which is we are referring as reducers one is collection of user then another is details of select users. Obviously action is user selection. Let’s club all this together build First components, its list down all dynamic HTML part of our application so App.js will be as follows

import React from 'react';
import UserList from '../containers/user-list';
import UserDetail from '../containers/user-detail';

require(

require('../../scss/style.scss');


const App = () => (
    <
    <div>         <h2>User List:</h2>         <UserList/>
        <hr />         <h2>User Details:</h2>         <UserDetail/>     </div> );

export default App;


Where App is main component and user list and user details are reducers. Then let’s create reducers index.js, it will hold all reducers of application into one place. In our case where we want to build user list and show user information it will have two reducers’  reducer-users.js & reducer-active-user.js
index.js

import {combineReducers} from 'redux';
import UserReducer from './reducer-users';
import ActiveUserReducer from './reducer-active-user';


const allReducers = combineReducers({

    users: UserReducer,

    activeUser : ActiveUserReducer
});

});
export default allReducers;


So allReducers is main reducer which holds reference of user reducer and Active User reducer.  reducer-users.js & reducer-active-user.js are as follows

export  default function () {
    
    return [
        {
       
        {             id: 1,
       
            first: "Manjul",
       
            last: "Dube",
       
            age: 71,
       
            description: "Manjul Dube",
       
            thumbnail: "http://lh5.googleusercontent.com/s80-c/photo.jpg"
   
        },
] reducer-active-user.js export default function (state=null, action) {

    switch(action.type){
   
        case "USER_SELECTED":
       
            return  action.payload;
   
        break;
    }


    }
    return state;
}
} 

reducer-active-user.js is important to focus as here we have defined action type user selected , it’s doing nothing special just define action call back method.. Action object hold two parts, first is description which say what is performed and second is result of action, so in action index.js will look as follows
index.js

export const selectUser = (user) => {

    console.log("You clicked on user: ", user.first);

    return {
   
        type: 'USER_SELECTED',
   
        payload: user
    }
};


So till now basic skeleton is ready, now we need to make containers, they will connect our application state to its component and make them smart state aware parts. Container hold following two important methods mapStateToProps & matchDispatchToProps.. So user-list.js container will look as follows

user-list.js

import React, {Component} from 'react';
import {bindActionCreators} from 'redux';
import {connect} from 'react-redux';
import {selectUser} from '../actions/index'
class UserList extends Component {

    createListItems(){
   
        return this.props.users.map(
            user => {
           
            user => {                 return (
                    <
                    <li
                   
                        key={user.id}
                   
                        onClick={ () => this.props.selectUser(user)}
                    >
   {user.
                    >   {user.first}  {user.last}
                    </
                    </li>                 );            }         );    }    render() {
   
        return (
            <
            <ul>                 {this.createListItems()}
            </
            </ul>         );     }}function mapStateToProps(state){

    return {
   
        users : state.users
   
}
}

    } } function matchDispatchToProps(dispatch){

    return bindActionCreators({selectUser: selectUser}, dispatch);
}

} export default connect(mapStateToProps ,matchDispatchToProps)(UserList);

user-detail.js

import React, {Component} from 'react';
import {connect} from 'react-redux'; class UserDetail extends Component {

    render() {
   
        if (!this.props.user) {
       
            return (<div>Select a user...</div>);
        }
   
        }         return (
            <
            <div>                 <img src={this.props.user.thumbnail}  height="150px;" width="230px;" />                 <h2>{this.props.user.first} {this.props.user.last}</h2>                 <h3>Age: {this.props.user.age}</h3>                 <h3>Description: {this.props.user.description}</h3>             </div>         );     } }function mapStateToProps(state) {

    return {
   
        user: state.activeUser
   
};
}
    }; } export default connect(mapStateToProps)(UserDetail);


Once application is ready, run npm start command that will run your application


If select any user it will give you following result


My goal was simple to understand Redux and manage state, I follow a boilerplate application and created something similar. Though its SPA and just learning sample but consist of all technical components and their interaction. it’s a beginner’s Travel Log, I stared with various blogs, tutorials and downloaded one of boilerplate from GitHub to go through Redux. What do you think? Let me know your inputs and questions that will lead another direction for learning and exploration.. 

Courtesy: Several online blogs, you tube videos, tutorials,GitHub sample code & other resources